I've just completed one of the most fun projects I've ever been involved with -- an altered book swap with Janice Williams Phelps. I forget how the idea came about, but we decided a couple of weeks ago to make small altered books, swap out halfway through to complete each other's books, and each keep one. Before even beginning really, Janice and I had the notion to keep and work on one book each, then exchange them, thus eliminating the question of who gets to keep which book and also the need to mail the books back and forth for completion. Smart gals, us.
Before I delve into the project more completely, a bit about Janice. We've never met in person (but hope to one day), and share a similar background and interest in all things creative. Whereas I consider myself a doodler/dabbler in the arts, Janice has mad skills. She's an awesome artist in several mediums, photographer, has a beautiful way of waltzing with words on several dance floors -- book illustration and design, editorial services -- oh, I could go on and on! Check out some of her recent work HERE. I'll just post a photo of her fine art below (which piece was one of the first to "hang" in Rose & Thorn Journal's art gallery), and hope she forgives me for not asking permission beforehand.

In other words, I love Janice's work! Be sure to sign up for and check out her blog. It's chock full of creative goodness.
Now, on to our Altered Book Swap Project. I'll describe how I treated each page of the children's book I made for Janice page-by-page. {If you're ever looking for a fun project to work on with a friend, this is it. You need NO particular skill; just a willingness to go where the book takes you, and a few basic art supplies. You'll be glad you did it. As a bonus besides the LOVELY one-of-a-kind personalized gift book I received in exchange, I learned a few things about myself in the process.}
 |

I used various Sharpies and markers throughout the pages, as here on the altered cover. How glad was I when Janice told me that sanding these slick pages made other materials adhere easily? Anywho, I added a title -- A WOMAN, AN ARTIST (which I also added to the thin spine with my name and date, using a white gel pen), collaged on a picture from an artist magazine I liked, doodled around with markers and a bit of Gouache around the wing edge, added some self-adhesive bling around the outer edge and on the eyes to make the butterfly look more feminine and interesting. The antenna are two small pieces of wire affixed with Gorilla Glue. (A must-have for this kind of project!) Each page was finished with Majic Crystal Clear Spray to keep them from sticking together and to hold everything in place. I hole punched front & back covers and laced in a piece of leather strip so the book can be tied in a loose bow to hold it shut if desired.

The inside cover is a combo of marker, collaged words and photos cut from magazines. I circled around the text already there to form a new sentence, blotting out the words I didn't want to use. I kept part of the original shiny butterfly wing as is.
The opposing page is collaged with tissue paper, magazine pictures, and one of Janice's own poems I decorated with markers and affixed with a small sponge tab thingy beneath so it stood away from the page. ModPodge glue was used on just about every page.


When the flap is opened, the "secret" page is revealed. It's a lovely magazine pic of a timeless woman on top of the sanded and painted page. I added a sticky 3-D flower and some prose with "found poem" before varnishing with the Majic spray.
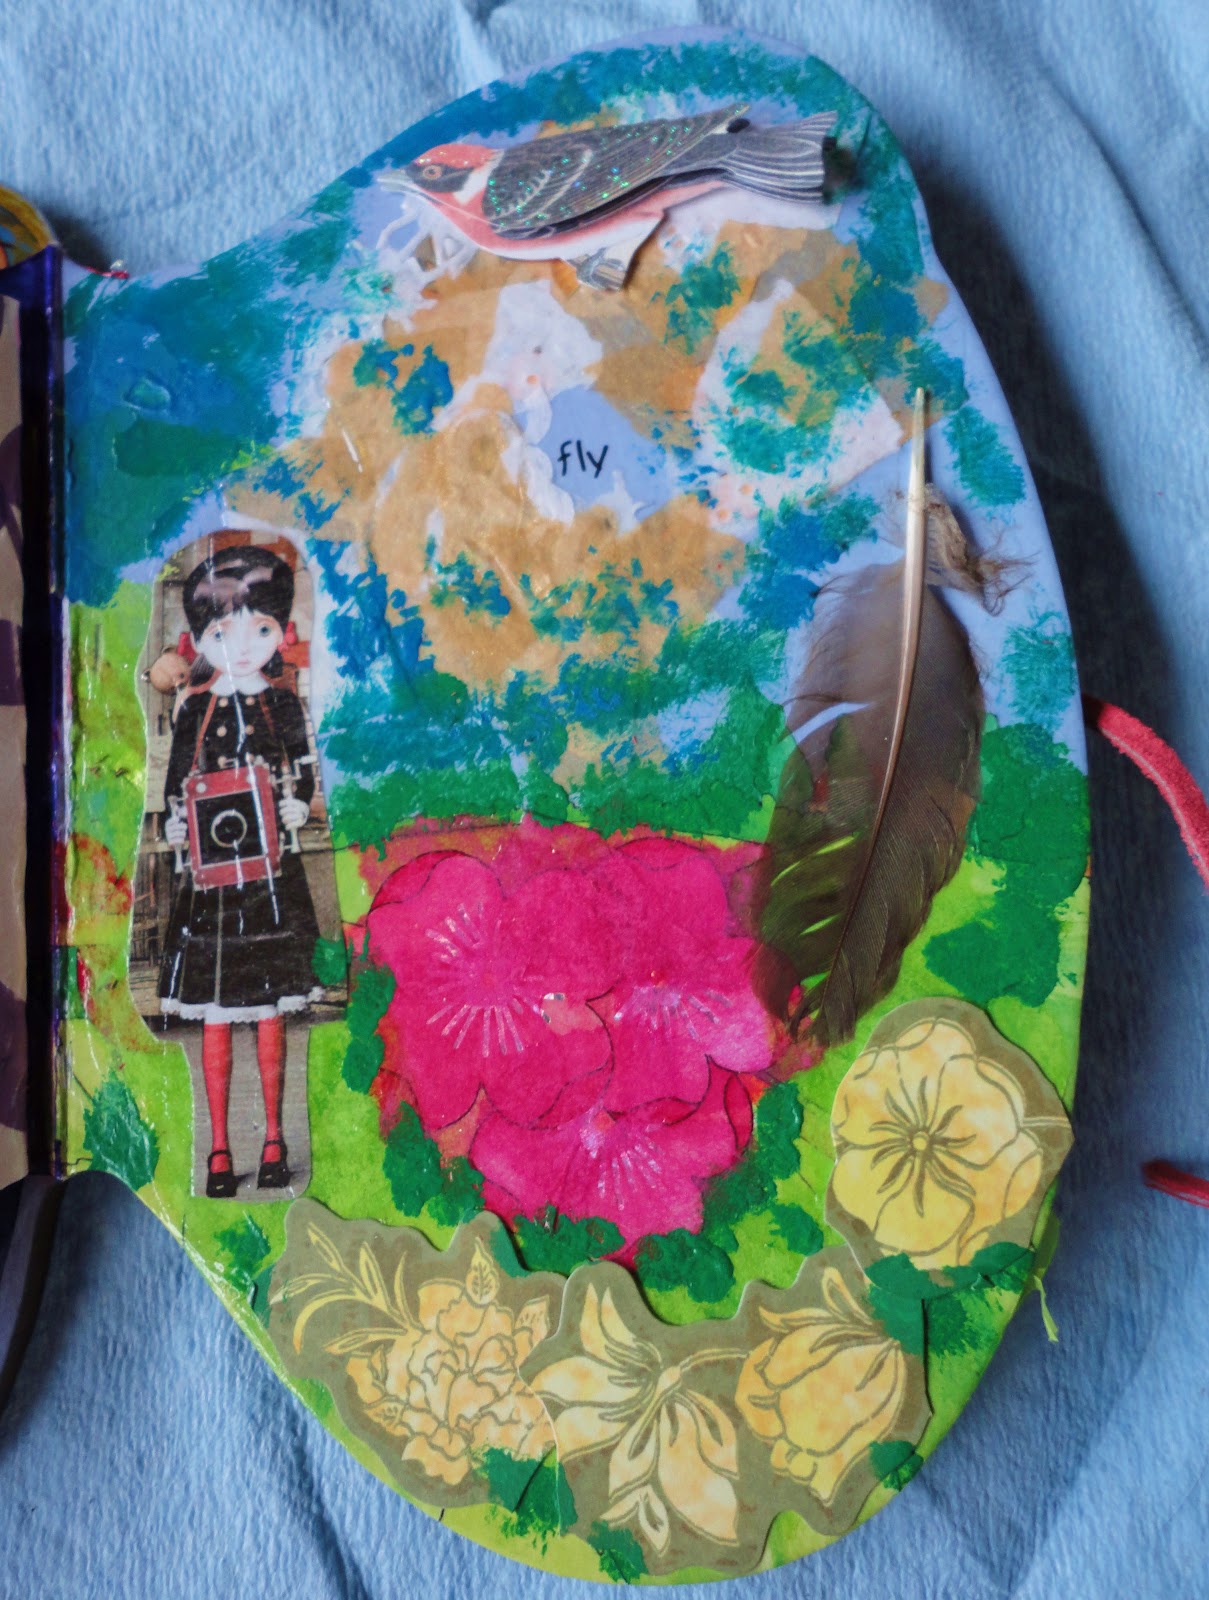

The page at right is a combo of ModPodged items such as the little Victorian photographer girl, pink tissue over the overly-loud flowers in the original book, paint, a 3-D paper bird, and a real feather. I've blotted out all the words except, "fly."

This page was really fun. Some of the element ideas to add actually came to me right before I fell asleep one night. I painted the whole page a rosy color except for the original text I decided to keep, Sharpied in the heart strings, and added an old iris greeting card cover. Then I added the words, "she is a PEACOCK!" to "Then one morning Caterpillar wakes up and . . ." The bird is a photograph of an albino peacock I took and printed out on regular paper, then decorated with various markers (except for its head). I couldn't bear to cut off all that beautiful tail, so I ModPodged it several times and sprayed a couple of coats on it and let dry, extended away from the book. Below, the tail is extended in a pull-out.

The next two pages were fun to do. I left the sun and some of the rays exposed, added a little Sharpie art I did on a piece of thicker artist's paper with the word "grow" added, left some of the words as the originally appeared, and covered up the rest with stick-on borders. I added on a few peel-and-stick butterflies, glued down and collaged on the flowers/sun marker picture I drew, then extended the sun rays over the artwork with some metallic gel pens.
 The page below, I wanted to reflect some of Janice's
 artistic interests and talents, and some of her many roles. These are depicted on the artist's palette and personalized paintbrush I drew on thick paper and tore out with rough edges showing. Magazine pictures and words were added to the collage, and a fortune cookie paper. ***I think I got these two photos in the wrong order, and am too stoopid to figure out how to switch them!


And finally, here's the back cover! Paint, collaged tissue paper, the tissue paper-covered piece poking through from the inside cover (which forms an abstract flower pot), more 3-D flowers, and stems I cut from a pad of white peel-and-stick art paper (what a fabulous pad to have on hand!) I colored green with a Sharpie.


WHEW! That's the story of the little butterfly book that morphed into something completely altered by one woman's handiwork.
@@@
And here is a photo of the AWESOME altered book swap project that arrived on my awaiting doorstep last Friday from Janice. Visit her blog where she is posting today about this cooler-than-skool exchange, and where I'm heading as soon as I hit publish!

@@@
And here is a photo of the AWESOME altered book swap project that arrived on my awaiting doorstep last Friday from Janice. Visit her blog where she is posting today about this cooler-than-skool exchange, and where I'm heading as soon as I hit publish!

PS WHAT Y'ALL BEEN DOIN'?? :D


